Avahi is explained in Wiki page, Avahi, but I don't get much of it; or I should say I don't know how to properly introduce Avahi. lol
For windows, there is a compatible and famous software called Bonjour, which is developed and distributed by Apple. When you download iTunes for Windows version, it includes Bonjour so if you have already installed iTunes on your computer, there is a high chance that your computer is already ready to communicate with Avahi enabled network computers.
Here is how to install avahi:
- Log in to your RaspberryPi; with IP number yet.
- Type in the magic install command: sudo apt-get install avahi-daemon
pi@desktoppi ~ $ sudo apt-get install avahi-daemon
Reading package lists... Done
Building dependency tree
Reading state information... Done
avahi-daemon is already the newest version.
0 upgraded, 0 newly installed, 0 to remove and 64 not upgraded.
pi@desktoppi ~ $
If you have iTunes already installed, it maybe already working now. Let's see if it works. On your RaspberryPi, you need to figure out what the hostname is. The command that shows the hostname is "hostname".
pi@desktoppi ~ $ hostname
desktoppi
pi@desktoppi ~ $ ping desktoppi.local
PING desktoppi.local (192.168.0.67) 56(84) bytes of data.
64 bytes from desktoppi.local (192.168.0.67): icmp_req=1 ttl=64 time=0.112 ms
64 bytes from desktoppi.local (192.168.0.67): icmp_req=2 ttl=64 time=0.153 ms
64 bytes from desktoppi.local (192.168.0.67): icmp_req=3 ttl=64 time=0.152 ms
^C
--- desktoppi.local ping statistics ---
3 packets transmitted, 3 received, 0% packet loss, time 2002ms
rtt min/avg/max/mdev = 0.112/0.139/0.153/0.019 ms
pi@desktoppi ~ $
*PS: for the super beginners, if you typed in "ping hostname.local", you will need to press "Control key" + "C" in order to stop the infinite pinging; it means cancel and it works for most of command line programs.
I will explain how to install iTunes later of this article but if you have already installed iTunes, you should be able to access the RaspberryPi with the hostname ".local".

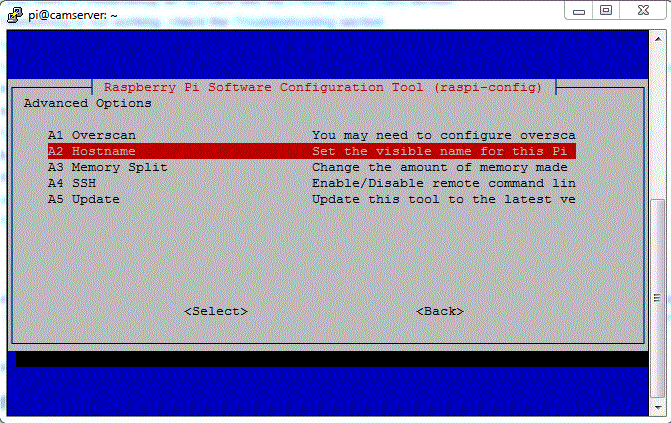
If you want to change the hostname, you can do so with a command "sudo raspi-config".
- Select "8. Advanced Options"
- Select "A2 Hostname"
- Change the name of host
- Come back to the first menu
- Press "Right arrow key" in order to select "<Finish>"
- It will ask you to reboot; this is to apply the new hostname.


Another way to change the hostname is to modify two text files, /etc/hostname and /etc/hosts. This is more of traditional way to change the hostname for Linux in general. And then in order to apply the change, you will need to reboot the Raspberry Pi. I am sure there are ways to apply the changed hostname without reboot but it was more complicated than I thought and I am skipping it.

The screenshot above shows the steps but when I modify the text files, I used "vi", which is hard to explain how to use so I am skipping it.
One of limitations that I forgot to mention early is that this hostname ".local" magic works only in your local network. If you go to the house of your friends and try to use the hostname ".local" in your home, it wouldn't work. In that case, you will need Dynamic Domain Name Service or DDNS such as Noip.
Also I found that Android system doesn't work with Avahi/Bonjour, which is little surprising and disappointing. Avahi covers Linux systems and Bonjour will cover MS-Windows, MacOS and iOS such as iPhone or iPad. Only thing that doesn't work is Android; plz let me know if anybody know how to get it working on Android. Every time I need to access my Raspberry Pi from Android devices, I must figure out IP number first then access it, which is little annoying.
I am going to explain how to install iTunes on your MS-Windows. It is supposed to be as easy as hitting "Next" buttons but it seems that Apple doesn't care much MS-Windows version of iTunes. It has never working for me; especially if your OS is 64bit-WindowsXP, I am sure the installation will fail.
The steps are here:
- Download iTunes for your MS-Windows
- Install WinRar or WinZip
- Unzip the iTunes64Setup.exe
- Install Bonjour64.msi

For some people, it can be little strange that you can unzip "EXE" file not "ZIP" or "RAR" files. But it is a compressed file and executable; don't think for a second that this is something brilliant trick Apple came up with. lol When you right click on the EXE file, WinRAR or WinZip will recognize and show you the option of "extract". If it doesn't show, you can open WinRar/WinZip and "Open" the iTunes EXE file. It will read the file and allow you to "extract".


Raspberry Pi Programming: Using Hostname For Raspberrypi Network Address Instead Of Ip Address >>>>> Download Now
ReplyDelete>>>>> Download Full
Raspberry Pi Programming: Using Hostname For Raspberrypi Network Address Instead Of Ip Address >>>>> Download LINK
>>>>> Download Now
Raspberry Pi Programming: Using Hostname For Raspberrypi Network Address Instead Of Ip Address >>>>> Download Full
>>>>> Download LINK T8