pi@desktoppi ~ $ sudo apt-get install qtcreator
Reading package lists... Done
Building dependency tree
Reading state information... Done
qtcreator is already the newest version.
0 upgraded, 0 newly installed, 0 to remove and 63 not upgraded.
pi@desktoppi ~ $
You can install Qt Creator with a simple command: sudo apt-get install qtcreator.
It will install bunch of other packages.
Once you installed the package, you can launch it with a command: qtcreator
You will see nice welcome page like screenshot above; you may need to setup PuTTY with X11-forwarding if you are connected from MS-Windows.
If you came this far, it was a big one step but the default setup wouldn't let you create Qt application as you expect. You need to change the setup. You will need to:
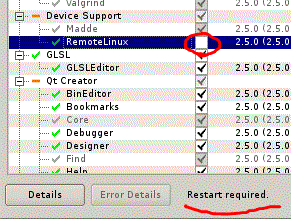
- uninstall one of plug-ins, "Remote Linux",
- set the path of gcc and gdb and
- set the path of qmake-qt4 for Desktop; not for Embedded Linux.
You can uninstall a plugin, "Remote Linux" from "About Plugins...", which is under "Help" on the menu; this menu organization feels like Eclipse. lol
You will find "Remote Linux" and you need to uncheck it and restart QtCreator.
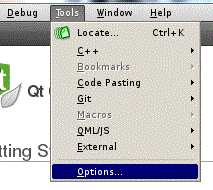
You need to setup the path of gcc and gdb from "Options..." under "Tools" on menu.
Go to "Build & Run" and click "Tool Chains" tab. Click "Add" and add "GCC". Fill up the form: "Compiler path" and "Debugger".
The actual path of gcc and gdb may little differ but you can figure it out by a command "whereis".
Lastly you need to set the path of qmake-qt4. You can do it from the other tab, "QtVersions". You will be able to find qmake_qt4 from the path, "/usr/bin/qmake-qt4"; I believe it is installed while qtcreator is installed.
Make sure that you see "Desktop" on the bottom after you set the path of "qmake-qt4". If it says "Embedded Linux", your plugin, "Remote Linux", hasn't been uninstalled yet.
All of setup process is done and let's create our first project.
Go to "File" on the menu and select "New File or Project".
We are going to create the first "Qt Gui Application". It will ask the name of project and where it should be stored. Fill them up and hit "Next" button.
You should be seeing "Desktop" on "Targets" step. If it shows only "Embedded Linux", probably your plugin, "Remote Linux", is not removed yet. If it says, "No valid QT version found.", your "QtVersion" setting went wrong.
You may see "Desktop" and "Embedded Linux" both on the "Targets" step if you uninstalled the plugin, "Remote Linux", and re-installed it, which is fine. But uncheck "Embeded Linux" for now. You can click "Next" buttons on "Details" and "Summary" steps.
You will see the first project default setup like screenshot above.
You can execute the default program by clicking the green arrow button on bottom left. It will show a progress bar that indicates compile progress.
You will be able to see an empty window created by Qt library as the final result.
As I mentioned earlier, QtCreator runs pretty fast on RaspberryPi. I haven't tried Debugging feature yet but it seems promising. It is not cross-compile and it makes whole thing so much simpler compare to the other try of mine. Qt-Creator seems to be a practically usable IDE on RaspberryPi.


Thanks for the article.
ReplyDeleteplease update your article little bit for newer version of Qt. A simple example in this article will boost its attractiveness.
I really appreciate this article. I would have struggled for a long time without it. Keep it up!
ReplyDelete