However, it is a little tricky to setup. The basic idea is that instead of securing the network connection with ID and Password, it will use Public key and Private key pair. I like to skip what it is but it has very interesting characteristics. The steps are:
- Generate public key and private key pair, which will be stored in files.
- Save private key file and public key file.
- Copy the public key to remote host, which is Raspberry Pi in this case.
- Register the private key file for Putty.
Once you go through all of these steps above, you will be able to login without typing ID or password.
This article assumes that you are using Putty as SSH client and your Raspberry Pi is running SSH server.
1. Generate public key and private key pair
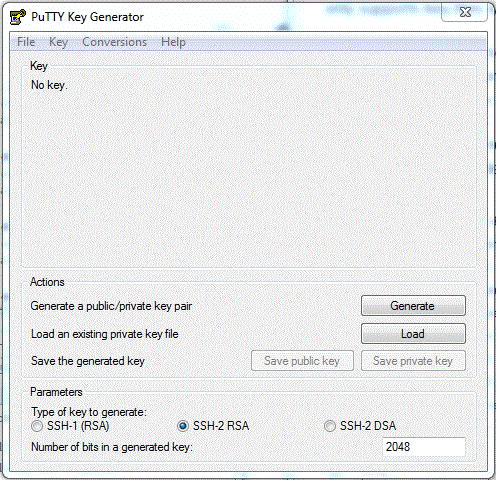
This step cannot be done with additional Putty program called, puttygen.exe. You can download it from the webpage you downloaded PuTTY.
Download it and run it. It will tell you that you have "No key" yet. Once you click on "Generate" button, it will take a few seconds to do really complex math calculation with some randomness from your mouse movement.
Once the generation step is done, now you can save two files and you should not forget to save them both.
2. Save private key file and public key file.
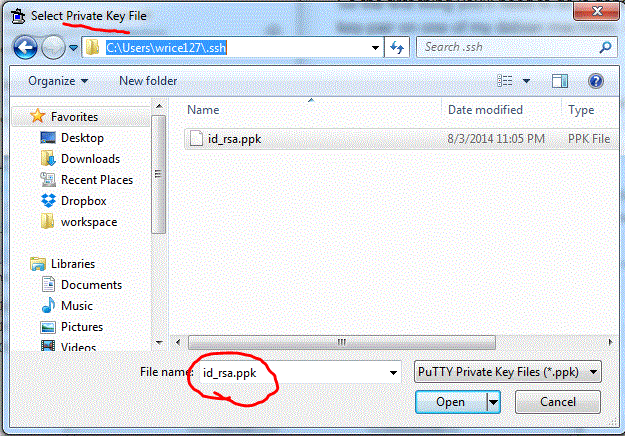
There are "Save public key" and "Save private key" buttons. It will ask you where to save those files and it can be anywhere you want. I stored it under C:\Users\wrice127\.ssh where "wrice127" is my MS-Windows login ID. The file name for private key can be any name but it is recommended to be "id_rsa.ppk" and the public key file is recommended to be "id_rsa.pub".
The public key file is, as the name implies, totally fine to be accessed by anybody on earth. But the private key file shouldn't be shown to anybody else. That's the theory but in this case those keys are for login only and if you don't care security much, you wouldn't need to worry too much; just don't delete the file. lol
When you generate the keys, you can optionally add "passphrase" before save out keys. It is always good idea to have it as an additional security.
After the keys are generated, it will show you the public key value on the window. You will need to copy the text string and keep it somewhere because you will need it in Step 3rd.
3. Copy the public key to remote host, which is Raspberry Pi in this case.
We are going to store the public on Raspberry Pi side.
Now let's login to your Raspberry Pi with Putty as usual.
And paste the public from Step 2 in a file ~/.ssh/authroized_keys2
If the file doesn't exist you will need to create one and change the file mod to 600: chmod 600 authorized_keys2
SSH service is very sensitive about the file permission for security reason. The file and the folder, ~/.ssh, both need to have 600 access permission.
4. Register the private key file for Putty.
There is another program you need to download: Pageant.exe. You can download it from where you downloaded PuTTY. Once you launch it, you see it as tray-icon.
When you double click on the icon, it will show keys there are registered for PuTTY clients.
Click "Add Key" button and select the private key file: "c:\Users\wrice127\.ssh\id_rsa.ppk" in my case.
It may ask you passphrase if you set it when you generate the keys.
Once the private key is registered, whenever you launch PuTTY, it will use the key. So the client side will use the private key and the server side, which is Raspberry Pi side, will use the public key.
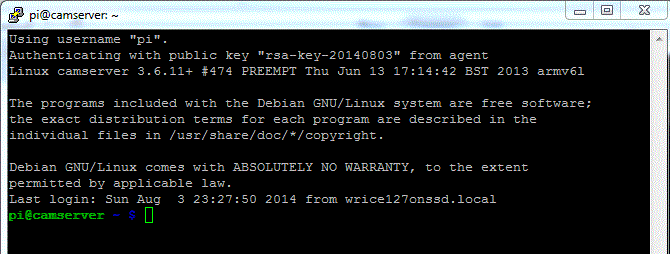
At this point, if you launch a new PuTTY and try to login, it will ask you ID but not password. If it is still asking you the password, something is not working. You may need to ask Google for help; sorry.
There is a way to skip the ID typing part. In PuTTY login window, you should type in not only the hostname but also the login ID like screenshot above. Do not forget to have '@' between the id and hostname.
Once you save the setting you will be able to skip ID and Password typing steps. It will look like a screenshot above. If you don't want to see the same warning message, you can do that by modifying a file, /etc/motd. motd stands for "message of today".


No comments:
Post a Comment